Monday, February 28, 2011

Sunday, February 27, 2011


Saturday, February 26, 2011


Friday, February 25, 2011
8 heads talls

you can draw out a simple set of rectangles to make sure your proportions are correct, then go find the organic curves of the figure after that
robot stick figure


the human body is full of complex and subtle shapes.
You can create a gesture with simple shapes and adjust proportions and shapes from that.
The Flexible "I"


These are VERY basic representations that you should understand by this point in the semester.
I post them here as a review, so you don't lose these important foundational concepts.
Here is a link to a very nice progression of simple lessons in figure drawing.
Although it is geared towards comic book illustration, It's worth reviewing.
http://www.scribd.com/doc/2080605/Figure-Drawing-Basics

Monday, February 21, 2011
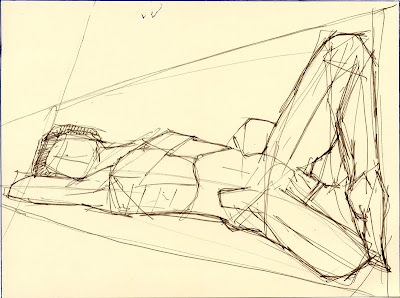
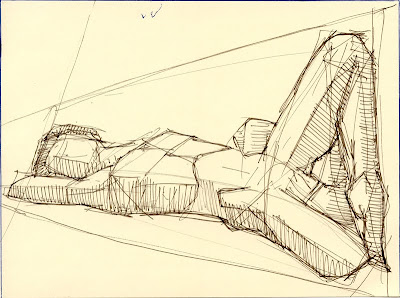
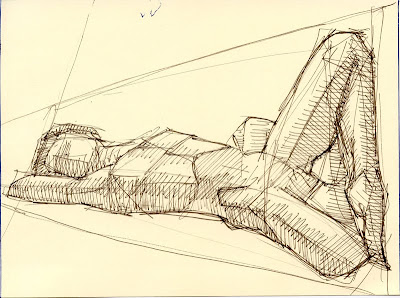
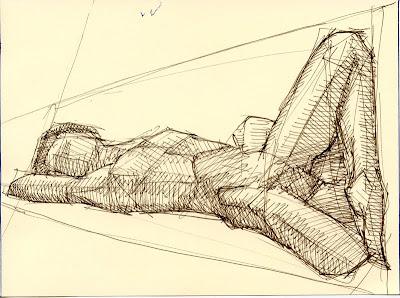
Simple Geometric Shapes
can sometimes be a good way to start a figure drawing

you can always refine the simple shapes in later steps as you find more detail in the model you are observing.


you can always refine the simple shapes in later steps as you find more detail in the model you are observing.

Monday, February 14, 2011
Cross Hatching and Cross Contours
define the space where the figure fits on the page
(look at the figure and imagine a line drawn from each outer edge)
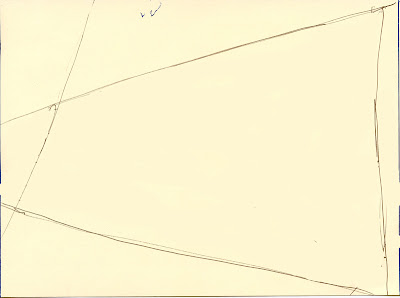
draw the main gesture of the figure.

draw the main gesture of the figure.
if you don't know where to start, try to see where the spine will be

start adding the mass of the larger body parts
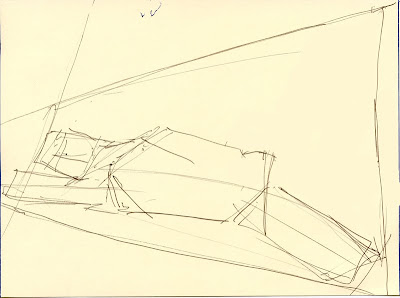
continue adding parts.

start adding the mass of the larger body parts

continue adding parts.
you may use super simplified boxy shapes.
the point is to define space.
you can make it more graceful later.
look for important structural parts, such as the rib cage
an indication of where the hips are,

look for important structural parts, such as the rib cage

an indication of where the hips are,
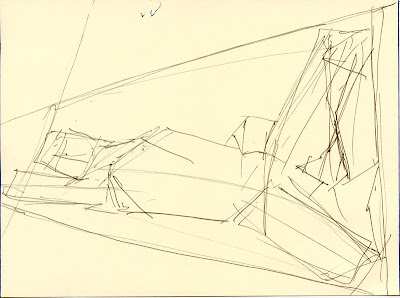
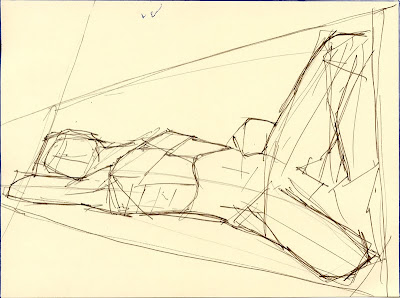
while you refine the outer edge
looking for shadows will help you refine the figure and make it look 3D
continue making hatch marks to refine the shadow areas.

looking for shadows will help you refine the figure and make it look 3D

continue making hatch marks to refine the shadow areas.
look for the super dark areas and the middle tones so you can make a distinction between the two.
the more variety you see in the shadows, the more convincing your drawing will be
an animated GIF of the above sequence.
http://www.100waves.com/CrossHatchingFigure.gif
Here is a post about creating volume with hatching and contours using a gel pen and brush that is an extension of this same technique with a pencil.
http://gestureoflife.blogspot.com/2010/09/creating-volume.html
And another post about using the gel pen and brush for objects other than the figure is found on the general drawing blog.
http://generaldrawing.blogspot.com/2010/09/volume-contours-cross-contours.html
This link will bring you to a video that demonstrates a stylized way to create volume in a figure with simple spirals.
http://www.youtube.com/watch?v=pyV-_7QEJQk&feature=related
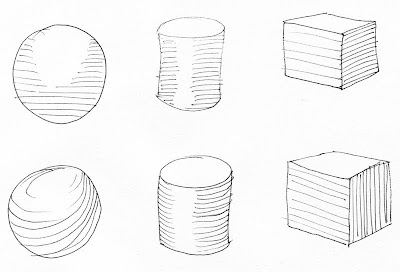
1. The top row of simple objects is shaded with hatching; straight lines create a sense of shadow.
The bottom row of simple objects is shaded with contours; essentially hatching that follows the surface contour of the object.
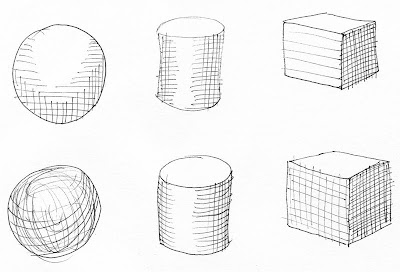
2. Top row: cross hatches are hatch marks going across the original hatch marks. Vary the placement to coincide with darker areas of the objects.
Bottom row: cross contours, like cross hatching, only continuing to follow surface contours of an object.
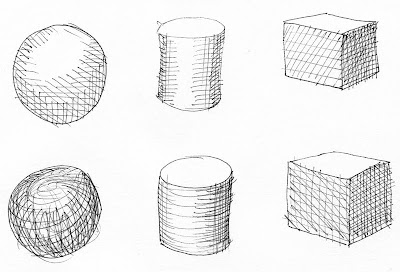
3. Continue working cross hatching and cross contours to develop more complex shadow areas.

the more variety you see in the shadows, the more convincing your drawing will be

an animated GIF of the above sequence.
http://www.100waves.com/CrossHatchingFigure.gif
Here is a post about creating volume with hatching and contours using a gel pen and brush that is an extension of this same technique with a pencil.
http://gestureoflife.blogspot.com/2010/09/creating-volume.html
And another post about using the gel pen and brush for objects other than the figure is found on the general drawing blog.
http://generaldrawing.blogspot.com/2010/09/volume-contours-cross-contours.html
This link will bring you to a video that demonstrates a stylized way to create volume in a figure with simple spirals.
http://www.youtube.com/watch?v=pyV-_7QEJQk&feature=related

1. The top row of simple objects is shaded with hatching; straight lines create a sense of shadow.
The bottom row of simple objects is shaded with contours; essentially hatching that follows the surface contour of the object.

2. Top row: cross hatches are hatch marks going across the original hatch marks. Vary the placement to coincide with darker areas of the objects.
Bottom row: cross contours, like cross hatching, only continuing to follow surface contours of an object.

3. Continue working cross hatching and cross contours to develop more complex shadow areas.
Sunday, February 13, 2011
a drawing strategy (simplified)
animated version
1. find and draw the gesture

2. draw the skeleton

3. draw major muscle groups

4. refine the muscles to get the shape better

5. find shadows

animated version
1. draw the gesture

2. draw the skeleton

3. draw large muscle groups

4. refine outline

5. hatching to make shadows

1. find and draw the gesture

2. draw the skeleton

3. draw major muscle groups

4. refine the muscles to get the shape better

5. find shadows

animated version
1. draw the gesture

2. draw the skeleton

3. draw large muscle groups

4. refine outline

5. hatching to make shadows

Anatomy for Artists
use these links for reference. You don't have to get into this much detail, particularly at the beginning of the semester. But, understanding how the human figure is constructed will help you see what is going on with the live model.
http://drawsketch.about.com/od/humananatomy/ig/Human-Anatomy-Reference-Photos/
http://www.drawing-tutorials-online.com/public/department48.cfm
http://drawsketch.about.com/od/humananatomy/ig/Human-Anatomy-Reference-Photos/
http://www.drawing-tutorials-online.com/public/department48.cfm
Monday, February 7, 2011
You are encouraged to scribble.
Just make a mark and get started.
You don't need to erase.
The more marks you make, the more reference points you have, and the more options you have at the beginning.
http://www.100waves.com/scribble.gif


Just make a mark and get started.
You don't need to erase.
The more marks you make, the more reference points you have, and the more options you have at the beginning.
http://www.100waves.com/scribble.gif


Wednesday, February 2, 2011
Gesture & Structure
The purpose of a gesture drawing is to capture the overall shape that a figure makes.
Your first step is to see if the body makes a simple shape. Draw that before anything else.
Take a look at the images in this link.
Pay particular attention to drawing # 11 & #14
http://www.arlenediehl.com/gallery.html
The shape of the gesture will imply movement; either dramatic movement or subtle movement of a live model.
*** If you had a very large brush, and were forced to define the movement of the figure in one or two brush strokes, what would that look like? ***
Your second step is to look for the skeleton. A simple stick figure can work well.


As you get better, your stick figures will be faster, less rigid, and look more like people.
You will learn to see movement and structure at the same time.


With even more practice, you will start seeing the gesture, skeletal structure, and a basic sense of mass at the same time.
Our goal, for the first half of the semester, is to get you seeing like this and creating advanced gestures like the two below.


------------------------------------------------------------------------------
Here is a quick video that shows the simple power of drawing a stick figure
http://www.youtube.com/watch?v=ArJB4FVQ60Y&NR=1
Subscribe to:
Comments (Atom)