Thursday, February 18, 2016

Monday, January 27, 2014
Animation Resources website and Life Drawing
http://animationresources.org/?cat=267

Follow the link at the top of this post for some great resources.
Note that animators of all sorts use the same things discussed in class to start their realistic drawings:
#1---an 8 heads-high idealized figure with legs being half of the the over-all height
#2---Contrapposto: shoulder line leans one direction, hip line leans another direction.
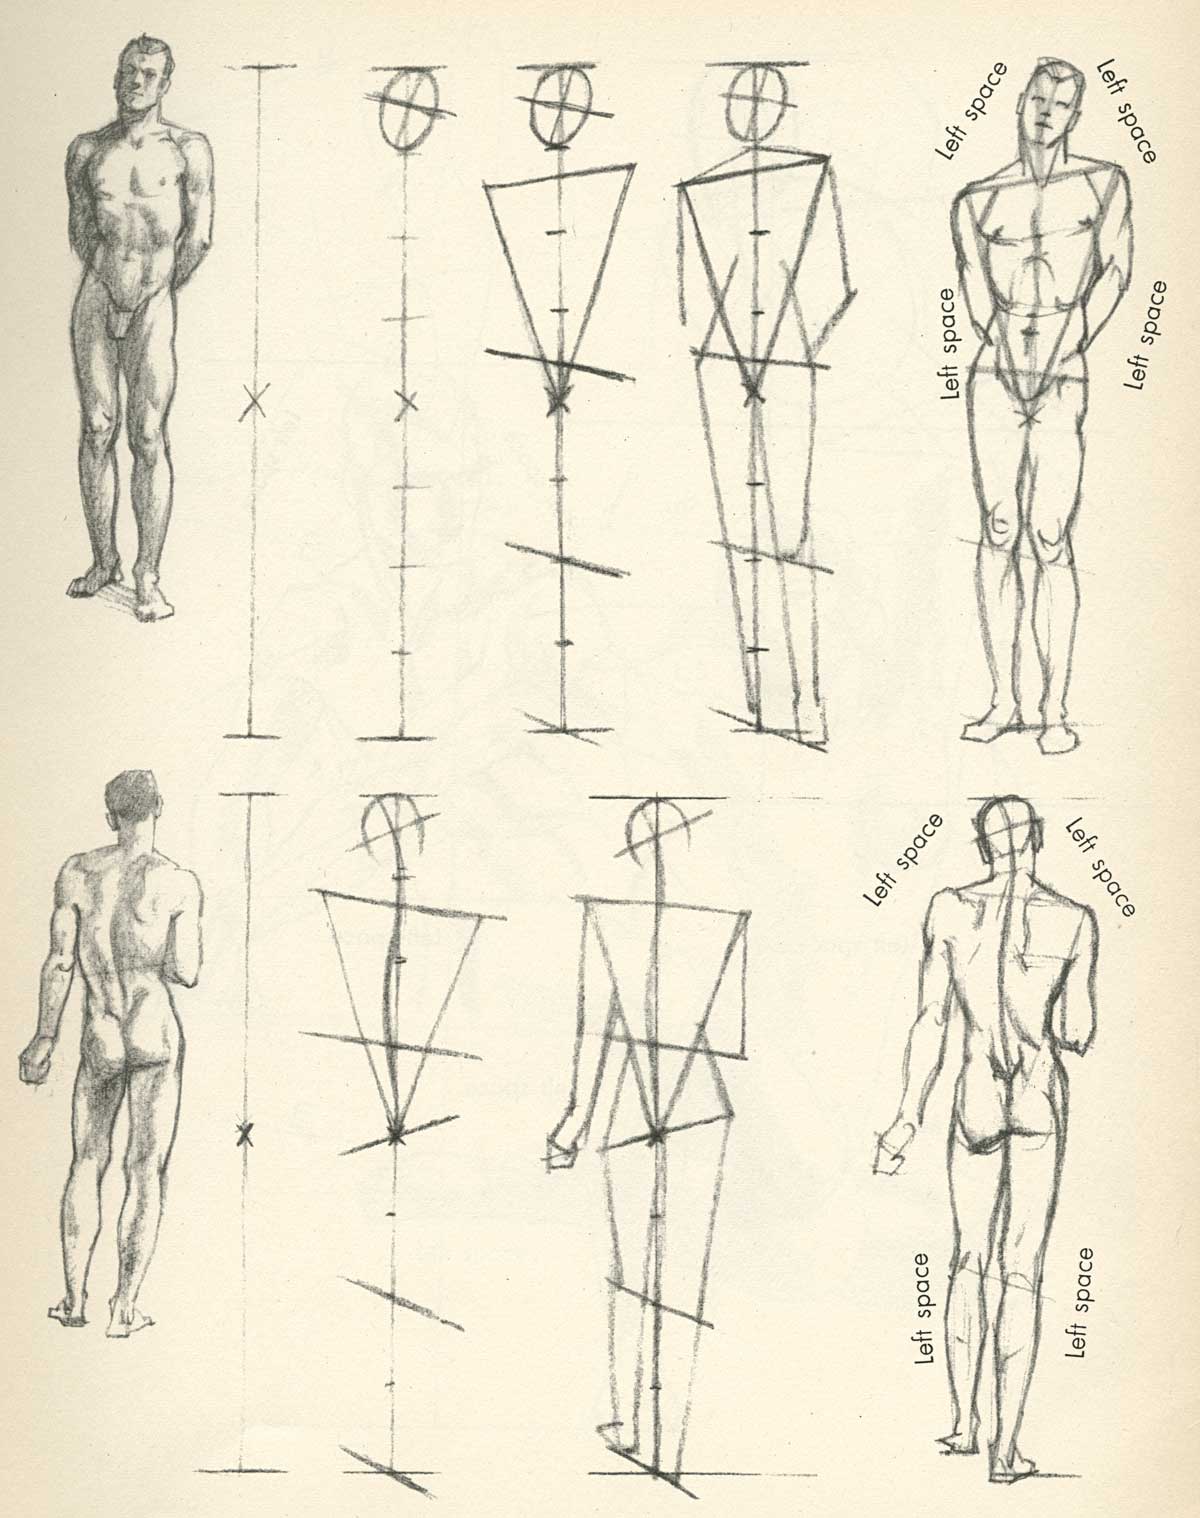
Follow the link at the top of this post for some great resources.
Note that animators of all sorts use the same things discussed in class to start their realistic drawings:
#1---an 8 heads-high idealized figure with legs being half of the the over-all height
#2---Contrapposto: shoulder line leans one direction, hip line leans another direction.
Saturday, November 23, 2013

Saturday, October 26, 2013
Drawing self portraits
here are two useful links for beginners
http://youtu.be/c5WawOPHCzg
http://www.craftsy.com/blog/2013/09/essential-tips-for-drawing-a-self-portrait/
Remember to work from general to specific.
General features first. Specific features last.
Overall large shapes first. Small shapes last.
Big shadow areas first. Details last.
Address the entire page, the entire drawing before you work on any detail.
Sunday, August 25, 2013
Wednesday, April 17, 2013
Wednesday, February 13, 2013
Animation
Here is a link to a tutorial on angryanimator.com that shows you the steps to develop a walking cycle for a humanoid figure.
It is based on the original Preston Blair tutorial found in one of his frequently reference books that guided many animators on a productive path.
It is based on the original Preston Blair tutorial found in one of his frequently reference books that guided many animators on a productive path.
Monday, October 29, 2012
Monday, October 8, 2012

Wednesday, September 12, 2012
Thursday, August 23, 2012
Tuesday, July 3, 2012
uForge Gallery call for entry
Want to have your figure work in a gallery show?
Check this out!
http://uforgegallery.com/pdfs/28_prospectus.pdf
I participated in a project this past spring. The gallery is well organized, and my work sold. So, I encourage you to look into this.
(they have regular assignments/show. Bookmark their page! Extra credit for those who participate.)
The gallery's main site is
http://www.uforgegallery.com
I participated in a project this past spring. The gallery is well organized, and my work sold. So, I encourage you to look into this.
(they have regular assignments/show. Bookmark their page! Extra credit for those who participate.)
The gallery's main site is
http://www.uforgegallery.com
Monday, June 25, 2012
Grand Canyon Gravure project
http://kck.st/LwzeJr
The goal is to collect the materials to get this project finished.
It is at it's half way point and I want to keep the momentum going!
Thanks to people who have let me borrow equipment this summer,
allowed me to find work space,
and encouraged me to keep going I think that the finish line is in sight.
Watch the video.
Click the links.
Share share share to anyone who might be interested!
(there are some really good deals for those who choose to be a part of finishing this project)
Monday, February 13, 2012
The Figure Occupies Space
Defining the space on your page, which the figure will occupy, is an early and important step towards making a good drawing.

You don't have to create a perfect outline, with accurate contours, but you do need to consider where the figure will be located on your page and how much of the page it will take up. For the majority of the semester (particularly for Life Drawing I students), you need to find ways to fit the entire figure on the page, making the figure take up as much of the page as possible without running off the edge.

Looking at the model, imagine an outline that touches all the outer-most points, creating a boundary in which the figure will fit. Sometimes the best first step is defining the highest point of the figure (usually the head, but if anything goes above the head then you must consider that might be the highest point), then defining the lowest point on the figure. Do the same thing from side to side. How wide is the figure? Include all parts and see what is protruding the furthest to the left and to the right.

Friday, February 10, 2012
humans are not symetrical robots
You may use simple shapes to get the proportions of a figure, but be careful not to get hung up in making perfectly even rectangles. As stated in the previous post about contraposto, people tend to favor one side, and not put equal weight on both sides. This might shift back and forth, but whatever the pose you are drawing, look for how the figure is leaning (how the head, shoulders, hips are tilted).


in this simplifed rectange version of the drawing above, the important measurements are the width of the shoulders and length of the ribcage (to form the largest rectangle you see), the height and width of the head, the width of the pelvis (hips).


in this simplifed rectange version of the drawing above, the important measurements are the width of the shoulders and length of the ribcage (to form the largest rectangle you see), the height and width of the head, the width of the pelvis (hips).


Wednesday, February 8, 2012
Contraposto
Although the term might have a specific definition, the idea of contraposto is derived from direct observation of how the human figure finds balance.

99% of the time, the angle of the shoulders counters the angle of the hips. (hips and shoulders lean in different directions). Even when someone is standing, they will favor one leg over the other. People are not symetrical.

If you have drawn the a figure in which the hips and shoulders are parallel, then you should question what you have made. Check your work. Chances are there is the slightest bit of opposite leaning between the two. Be sure to check your work before your refine your drawing. Beginning students should demonstrate that they understand the underlying structure and how parts of the body move in opposing directions.
Contraposto will make for more convincing figure drawings.
Wednesday, December 7, 2011
printmaking at FDU
Spring 2012
monotype technique example
http://youtu.be/Re7PMzGEReQ
monoprint with collage pieces
http://youtu.be/ajx3d7PTm68
inkjet transfer to wood
http://youtu.be/qWJx86ZxK5A
acrylic gel transfer from inkjet printer
http://youtu.be/cs8CvTFsFMU
anthotype example
http://youtu.be/H0qZLfbQVMM
Spring 2012
monotype technique example
http://youtu.be/Re7PMzGEReQ
monoprint with collage pieces
http://youtu.be/ajx3d7PTm68
inkjet transfer to wood
http://youtu.be/qWJx86ZxK5A
acrylic gel transfer from inkjet printer
http://youtu.be/cs8CvTFsFMU
anthotype example
http://youtu.be/H0qZLfbQVMM
Thursday, November 10, 2011

Subscribe to:
Posts (Atom)